Resource guarding can feel like a ticking time bomb. One minute your dog is calmly chewing a toy, the next they snap, growl, or lunge when you come near. It’s scary, it’s stressful, and it can turn a happy home into a constant worry zone. In this guide we’ll walk you through a clear, practical plan so you can stop the guarding, rebuild trust, and keep everyone safe.
We’ll cover five steps: spotting triggers, assessing the situation safely, teaching key commands, desensitizing the dog, and keeping the progress steady. By the end you’ll have a roadmap you can start today.
Step 1: Identify Triggers and Resources
First thing is to figure out what makes your dog go on guard. Resource guarding isn’t a random mood swing; it’s a response to something the dog values. Common triggers include food bowls, high‑value chew toys, favorite blankets, or even a spot on the couch. Some dogs also guard people , they may growl if a stranger sits on the lap they’re enjoying.
Watch the body language. A stiff posture, a hard stare, or a slight lip curl can signal that the dog is getting uncomfortable. According to Wikipedia’s definition of resource guarding, the behavior ranges from a low‑key glance to full‑blown snapping. The key is to notice the early signs before they turn into a bite.
Take notes. Write down the exact item, where it happened, who was present, and what the dog did. Over a week you’ll start to see patterns , maybe the dog only guards the chew when another dog is in the room, or only when you’re on the couch.
Understanding the trigger lets you plan the next steps. If the guard is about a specific toy, you can start by working with a lower‑value version of that toy. If it’s about the food bowl, begin the training a few inches away and gradually close the distance.
Bottom line:Identify the precise resource and the warning signs before you try to change the behavior.
Step 2: Conduct a Safe Resource Assessment
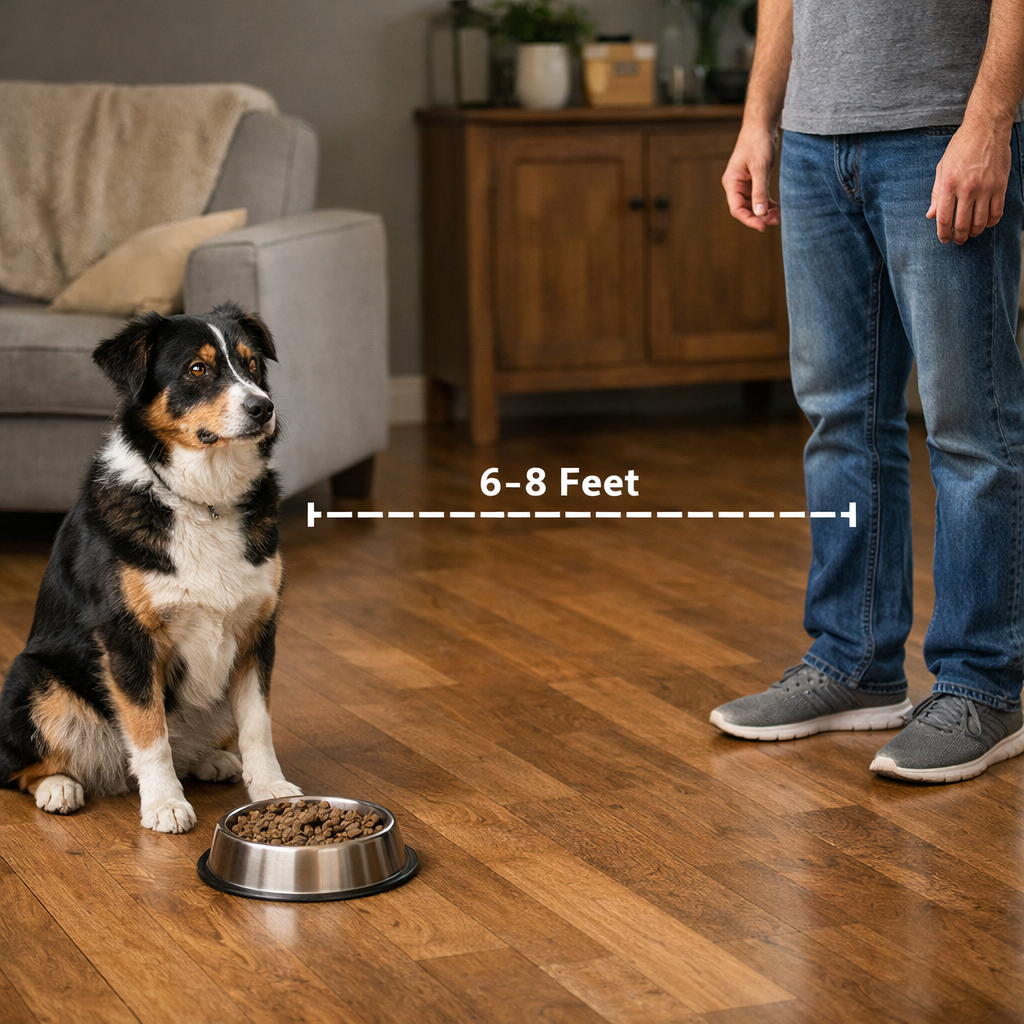
Now that you know what sparks the guarding, set up a controlled test. The goal is to at a safe distance. Choose a time when the dog is calm , not right after a walk or a meal.
Start far enough away that the dog stays relaxed. Slowly step a few inches closer, then stop. If the dog shows a stiffening, lip curl, or low growl, you’ve moved too close. Back up to the last comfortable spot and mark that distance as your starting point.
Repeat the approach‑and‑stop routine several times, always returning to the comfortable distance after each step. This gives you a baseline for how close you can get without triggering guarding. It also shows the dog that you’re not trying to take the item away, just observing.
Keep the sessions short , five minutes tops , and end on a positive note. If the dog stays relaxed, reward with a calm praise or a treat that isn’t tied to the guarded item. This helps the dog associate your presence with good things rather than a threat.
Safety first. If you ever see a snap or the dog lunges, stop the test immediately and increase the distance. Use a leash or a sturdy tether if you need extra control, but never force the dog into a position that feels threatening.
Bottom line:Conduct the assessment at a safe distance, record the comfort point, and always reward calm behavior.
Step 3: Teach the “Leave It” and “Trade” Commands
With the baseline set, it’s time to give the dog a clear alternative to guarding. The “Leave It” cue tells the dog to disengage from the resource, while “Trade” offers a high‑value swap. Both rely on positive reinforcement , no punishment, no yelling.
Start with a low‑value item, like a dry kibble piece. Hold the treat in your closed fist and say, “Leave it.” When the dog sniffs or paws, wait. The moment they look away, open the fist and say “Yes!” followed by a clicker or a click‑like sound, then give a tasty treat from your other hand. This builds the association that looking away earns a reward.
Once the dog reliably leaves a low‑value item, move to a higher‑value toy. Use the same “Leave it” cue, but follow immediately with a “Trade” cue: hold a super tasty treat (like a piece of chicken) and say “Trade.” When the dog drops the toy for the treat, praise enthusiastically.
This two‑step method works because the dog learns that giving up the guarded item doesn’t mean loss , it means gain. It also gives you a tool to manage real‑life moments, like when you need to take the food bowl for cleaning.
For a deeper dive on why positive reinforcement works so well, check out our Positive Reinforcement Dog Training guide. It explains the science behind reward‑based learning and gives extra tip sheets you can print.
“The best outcome is when the dog chooses to give up the resource because it trusts you’ll give something better, not because you force it.”
Bottom line:Teach “Leave It” for disengagement and “Trade” for a rewarding swap, using high‑value treats.
Step 4: Gradual Desensitization & Counter‑Conditioning
Desensitization is the process of lowering the dog’s emotional reaction to the guarded item. Counter‑conditioning pairs the previously scary stimulus with something the dog loves. Together they rewrite the dog’s brain response.
Pick a calm day and a low‑value version of the guarded resource. If the guard is about a chew toy, use a cheap replica. Place the toy on the floor, sit a comfortable distance away (the one you recorded in Step 2), and toss a treat toward the dog while saying a relaxed cue like “Watch me.” If the dog looks at you, stays relaxed, and takes the treat, reward with praise.
Repeat this “look‑at‑me‑and‑treat” loop many times, slowly decreasing the distance by a few inches each session. The key is to move back as soon as you see any sign of tension , a stiff body, a raised lip, or a low growl. The dog learns that being close to the item while you’re present is safe and rewarding.
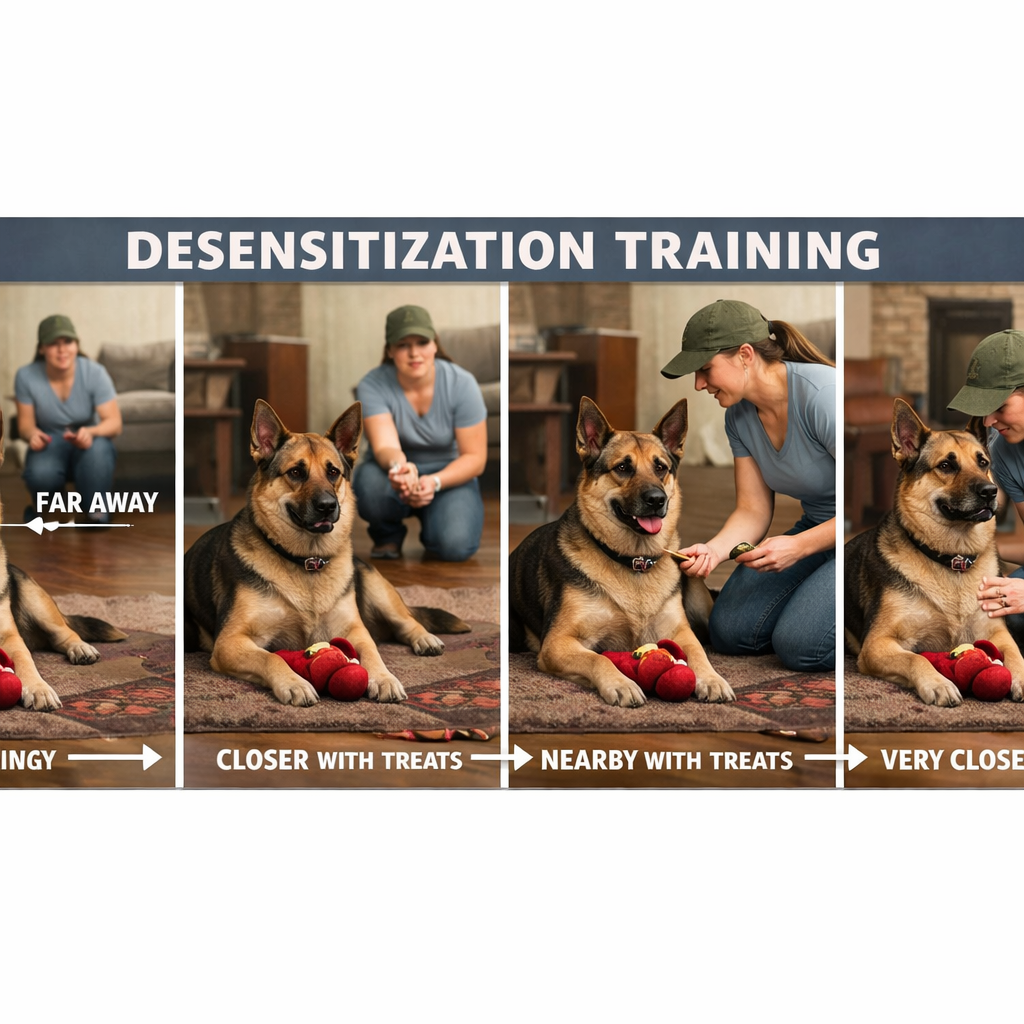
When the dog can stay relaxed within a few inches of the real item, add the “Leave It” cue into the mix. Ask the dog to leave the toy, then immediately give a high‑value treat. Over weeks, the dog’s emotional reaction shifts from threat to anticipation of a treat.
Bottom line:Gradual exposure paired with treats rewires the dog’s fear into a positive expectation.
Step 5: Maintain Boundaries & Prevent Relapse
Training isn’t a one‑time event. Even after the dog stops guarding, you need to keep the good habits alive. Consistency is the safety net that prevents old habits from creeping back.
Set clear rules about resource access. Feed the dog in a quiet spot, separate high‑value toys, and avoid sudden snatches. If you have multiple pets, feed them in separate bowls or use a gate to give each dog space.
Keep the environment enriched. Mental games, puzzle feeders, and scent work give the dog alternative outlets for high energy, reducing the urge to guard. For ideas, see our Best Mental Stimulation for Dogs Guide 2026. A busy mind is less likely to fixate on a single resource.
Regular check‑ins with your vet are wise, especially if the guarding started suddenly. Pain or medical issues can heighten protectiveness. The American Kennel Club’s guide lists warning signs and health‑related triggers you should watch for.
Bottom line:Maintain clear rules, keep training fresh, and provide mental outlets to prevent relapse.
FAQ
What is the first sign that my dog is resource guarding?
The earliest clue is usually a subtle body cue: a stiff posture, a fixed stare, or a slight lip curl when you approach a valued item. These signals often appear before any growl or snap. Catching them early lets you intervene before the behavior escalates.
Can I use punishment to stop guarding?
No. Punishment can heighten fear and make the dog view you as a threat, worsening the guard. Positive‑reinforcement methods, like the “Leave It” and “Trade” cues, replace the fear with a rewarding expectation and are proven to be more effective.
How long does it take to see results?
Progress varies by dog and severity. Some dogs show improvement after a week of consistent practice, while others may need several weeks to months. The key is to move at the dog’s pace, never rushing past a warning sign.
Do I need a professional trainer?
If the guarding is mild, you can follow this guide on your own. For severe cases, especially those involving biting or strong aggression, consult a certified behaviorist. They can tailor a plan, ensure safety, and address any underlying medical issues.
My dog guards a person, not a toy. Does this plan still work?
Yes. The same principles apply: identify the trigger (the person), assess safe distance, teach “Leave It,” desensitize with gradual exposure, and keep boundaries. Treat the person as a “resource” and reward calm behavior when you approach.
How can I keep my other pets safe during training?
Use separate feeding areas and manage interactions with leashes or gates. When you practice cues, do it with one dog at a time. Reward each pet for calm behavior to reinforce that sharing space is safe.
What if my dog suddenly starts guarding a new item?
New triggers can appear if the dog’s routine changes, like a new chew toy or a different feeding spot. Repeat Steps 1 and 2 to map the new trigger, then follow the same training sequence. Consistency prevents the behavior from spreading.
Is there a way to know if my dog’s guarding is health‑related?
Yes. Sudden guarding, especially in older dogs, can signal pain or illness. A vet check‑up can rule out medical causes. If pain is present, treating the underlying issue often reduces the guarding instinct.
Conclusion
Resource guarding is a natural instinct, but with the right plan you can turn it into a harmless habit. By spotting triggers, testing safe distances, teaching “Leave It” and “Trade,” desensitizing gradually, and keeping the routine steady, you give your dog a clear path to feel secure without snapping. Remember to reward calm moments, keep the environment enriched, and seek professional help if the behavior spikes.
Ready for the next step? Explore our Best Mental Stimulation for Dogs Guide 2026 to add fun puzzles and scent games that keep your dog’s mind busy and less likely to guard. A well‑stimulated pup is a happier, more balanced companion.
Stay patient, stay consistent, and watch the tension melt away. Your dog will thank you with relaxed wag‑tails instead of wary growls.